In the realm of home plumbing, ensuring your washing machine is complemented by a code-compliant standpipe is not just a matter of best practice; it’s a necessity. Failing to meet specific plumbing codes can lead to inefficiency, costly repairs, and even water damage. This guide unpacks the critical elements and provides practical insights into installing a regulation-compliant washing machine standpipe.
- Discover the essential plumbing codes and standards crucial for a compliant standpipe installation.
- Understand the integral components of a standpipe system, from pipes to traps and vents, ensuring functional plumbing.
- Follow a step-by-step process to achieve a successful and compliant washing machine standpipe installation.
- Learn to identify and avoid common installation errors for long-lasting performance and safety.
By navigating through this guide, you will not only understand the theoretical aspects but also gain practical knowledge to implement a durable and compliant standpipe system, ensuring peace of mind and regulatory satisfaction. Dive into the specifics to enhance your plumbing setup effectively.
Understanding Code Requirements for Washing Machine Standpipe Installation: Code Compliance Essentials
When undertaking a washing machine standpipe installation, it is vital to comprehend the plumbing codes and standards that govern this process. Compliance is not just a matter of legality; it ensures both safety and efficiency in operation.
The International Plumbing Code (IPC) and the Uniform Plumbing Code (UPC) provide the fundamental guidelines that dictate installation procedures. These regulations cover aspects such as the height of the standpipe, which must generally be at least 18 inches high and no more than 42 inches off the ground. This ensures adequate drainage and prevents overflow.
Another crucial standard involves the diameter of the standpipe, where a minimum diameter of 2 inches is typically required to facilitate efficient water flow and avoid clogs. Proper venting is also emphasized in the codes to prevent negative pressure, which can lead to siphoning and water seal loss.
Understanding these essential code requirements not only aids in proper installation but also ensures that the plumbing system is robust, reliable, and free from safety hazards. Adhering to these regulations protects property and enhances the overall effectiveness of the washing machine’s drainage system.
Key Components of a Washing Machine Standpipe System
A washing machine standpipe system is composed of several critical components that work together to ensure the system functions correctly and complies with all relevant plumbing codes. Knowing these components and their roles is important for successful installation and maintenance.
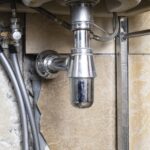
The standpipe itself is an essential element, acting as the conduit through which the washer drains water. It must be of an appropriate height and diameter to comply with regulatory standards. The p-trap, positioned at the base of the standpipe, plays a vital role in preventing sewer gases from entering the building by maintaining a water seal.
Pipes form another critical component, connecting the standpipe to the rest of the drainage system. The material and diameter of these pipes must match the requirements dictated by plumbing codes to ensure proper water flow and durability.
Venting is crucial within the standpipe system to allow air flow and prevent the pressure build-up that can lead to drainage backflow. Ensuring that all these components are correctly installed and maintained will contribute to the system’s compliance and functionality.
By understanding and implementing these key components properly, you can avoid common issues and ensure that your washing machine standpipe operates efficiently and safely.
Step-by-Step Guide to Code-Compliant Washing Machine Standpipe Installation
Installing a washing machine standpipe properly is crucial to ensure code compliance and efficient operation. Follow this comprehensive guide to achieve a successful installation.
Gathering Tools and Materials:
Before starting, make sure you have the essential tools and materials. You’ll need a pipe cutter, PVC pipes, a P-trap, primer, and solvent cement. Also, ensure you have a spirit level, a measuring tape, and a power drill.
Determine Standpipe Location:
Identify the ideal location for your standpipe. It should be close to the washing machine yet adhere to local plumbing codes. Typically, the standpipe must be at least 18 inches above the trap but no higher than 42 inches from the floor.
Install Drain Assembly:
Begin by assembling the PVC pipes and fitting them to create the drain. Utilize the power drill to attach brackets, ensuring the pipes are secure. Avoid any needless bends or twists that might impede water flow.
Secure the P-Trap:
The P-trap is essential for preventing sewer gases from entering your home. Place it correctly between the vertical standpipe and the horizontal waste line. Take care to seal the joints with primer and solvent cement to prevent leaks.
Connect to the Main Drain:
Attach the horizontal arm of the P-trap to the main drain line. Ensure it aligns correctly, using a spirit level for precision. Maintaining a slight downward angle assists in the proper flow of wastewater.
Test for Leaks:
Once the installation is complete, test the system to ensure there are no leaks. Run the washing machine and check all joints and connections. It’s vital to address any leaks immediately to maintain compliance.
Common Mistakes and How to Avoid Them in Washing Machine Standpipe Installations
Even experienced DIY enthusiasts can stumble on particular challenges during washing machine standpipe installation. Understanding common mistakes can help in creating a compliant and efficient system.
Incorrect Standpipe Height:
A frequent error is setting the standpipe at an incorrect height. Make sure the standpipe is positioned between the advised 18 to 42 inches from the floor, ensuring compliant operation.
Improper Sealing of Joints:
Failure to adequately seal joints can lead to leaks and water damage. Always use primer and solvent cement for all connections. Double-check each joint to guarantee strong bonds.
Insufficient Ventilation:
Neglecting proper venting can cause trap siphoning and odors. Ensure that your plumbing system includes necessary venting. Consult local plumbing codes to verify vent requirements.
Lack of Slope in Piping:
Pipes without the correct slope will impede drainage efficiency. Maintaining a consistent downward slope is necessary. Use a level to confirm accuracy during installation.
By understanding and sidestepping these mistakes, your washing machine standpipe installation will be both code-compliant and efficient. Share your own experiences with installing standpipes or any additional tips you might have in the comments below!
Maintenance Best Practices for Code-Compliant Washing Machine Standpipes
Maintaining a washing machine standpipe is crucial for ensuring its long-term functionality and compliance with plumbing codes. Consistent maintenance not only helps to avoid costly repairs but also keeps the plumbing system efficient and safe.
Regular Inspections: Conduct routine inspections of your washing machine standpipe. Look for any signs of wear and tear, such as cracks or leaks, which could indicate a failing system. Inspect the connections and fittings for any potential issues, ensuring that everything is secured and in good condition.
Cleaning and Unclogging: A common issue with washing machine standpipes is clogging due to lint and debris. Regularly clear out any buildup to prevent blockages. Using a suitable cleaning solution occasionally can help keep the pipes clear and in optimal working condition.
Ensure Proper Venting: Verify that your standpipe is adequately vented. The absence of proper venting can cause inefficient drainage and unusual noises. Check to ensure vents are unobstructed, promoting superior water flow and preventing pressure build-up within your plumbing system.
Check Water Flow and Pressure: Monitor the water flow and pressure going through the standpipe during washing machine operation. Abnormal fluctuations might suggest hidden obstructions or issues within your plumbing system.
Adopt Preventive Measures: Consider installing a lint trap or filter to prevent excess lint from entering the standpipe. These devices capture lint before it becomes a problem, reducing the risk of clogs and enhancing standpipe longevity.
By adhering to these maintenance best practices, you can ensure your washing machine standpipe remains in accordance with code requirements and operates efficiently for years to come. If you have further tips or experiences with maintaining your washing machine standpipe, share them in the comments below!
Frequently Asked Questions about Washing Machine Standpipe Installation
What is the standard height for a washing machine standpipe?
The standard height for a washing machine standpipe is typically between 18 to 30 inches above the trap weir to ensure proper drainage.
What size should the standpipe be?
A washing machine standpipe should be at least 2 inches in diameter to accommodate water discharge effectively.
Do I need a vent for my washing machine standpipe?
Yes, a vent is necessary to prevent negative pressure and ensure proper drainage.
Can a washing machine standpipe share a drain with other plumbing fixtures?
It depends on local codes, but typically, it can share a drain if the system is properly vented and can handle the discharge volume.
What is the function of a trap in the standpipe system?
A trap prevents sewer gases from entering the home by maintaining a water seal.