Your dryer plays a crucial role in maintaining your household’s efficiency, yet it can be frustrating when it suddenly stops heating. Understanding the underlying reasons for this malfunction can save you both time and money, preventing prolonged downtimes in your daily routine. This article delves into the common culprits behind a dryer that’s not heating, focusing on thermal fuses and heating elements, and provides actionable solutions.
- Identifying the early signs that indicate why your dryer isn’t heating can streamline diagnosis and repairs.
- Testing and replacing thermal fuses can restore your dryer’s heating capability safely and efficiently.
- Explore how to repair or replace faulty heating elements to ensure your dryer operates at its optimal performance once again.
Armed with the insights from this guide, you’ll be better prepared to solve heating issues in your dryer, ensuring it functions efficiently and reliably once more.
Identifying the Problem: Why is My Dryer Not Heating? Troubleshooting Thermal Fuses and Heating Elements
If you’re experiencing a dryer that fails to heat, it can disrupt your routine and lead to longer laundry cycles. There are several initial signs to watch for that indicate your dryer is not heating effectively. Clothes will come out damp or overly wet after a full cycle, and there may be an absence of warmth when you open the dryer door.
In troubleshooting these issues, understanding common causes can save time and stress. Begin by checking the basic components. Ensure that the dryer is properly plugged in and that the circuit breaker is not tripped. Those new to dryer repair might initially overlook these straightforward aspects.
Next, consider whether the thermal fuse—an essential safety device designed to prevent overheating—might be the source of the problem. A blown thermal fuse will cut power to the heating element, thus preventing the dryer from heating.
Equally important is the heating element, which generates the heat necessary for drying clothes. Malfunctioning heating elements can be caused by wear and tear or electrical issues. As you proceed with the troubleshooting process, isolating these components will help in pinpointing the root of the heating problem.
Testing Thermal Fuses in a Dryer: Critical Steps
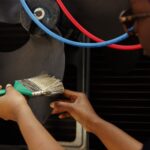
Testing and replacing the thermal fuse is crucial for restoring your dryer’s heating capability. To safely test the thermal fuse, first ensure the dryer is unplugged to avoid any electrical hazards. Safety should always be a top priority when working with home appliances.
Access the thermal fuse by removing the dryer’s back panel, typically held in place with screws. The thermal fuse is usually found near the exhaust vent. Once located, use a multimeter to test for continuity. A reading indicating no continuity suggests a blown fuse, confirming the need for replacement.
Replacing the thermal fuse is straightforward. Ensure you purchase a fuse compatible with your dryer’s model. Install the new fuse by securing it with the existing connectors, and reassemble the dryer’s panel.
After installation, plug the dryer back in and run a test cycle to confirm if the heating issue is resolved. By following these steps, you can effectively restore your dryer’s functionality, maintaining efficient operation.
Repairing Heating Elements: Solutions for a Dryer Not Heating
If your dryer is not heating, one potential culprit could be a faulty heating element. Understanding how to repair or replace heating elements is crucial in restoring your appliance’s functionality.
Heating elements in dryers are responsible for converting the electrical power to heat, which dries your clothes efficiently. When these elements malfunction, the dryer might spin but won’t produce the necessary heat. Let’s dive into the steps to repair or replace heating elements and get your dryer back to optimal performance.
Symptoms of a Faulty Heating Element
Before tackling the repair, it’s essential to recognize the signs that the heating element may be the issue. Common symptoms include clothes remaining wet after a full cycle and no noticeable warmth inside the drum when the dryer is running. If these signs are present, the heating element might need attention.
Repair and Replacement Process
Begin by ensuring the dryer is unplugged to prevent any electrical hazards. Safety should always be your first concern. Wear safety goggles and work gloves.
Next, consult the user manual for your specific dryer model. This can provide detailed instructions on accessing the heating element. Typically, you will need to remove the back panel of the dryer, which means carefully detaching the screws and any connected parts.
Once you access the heating component, visually inspect it. Look for signs of damage, such as breaks or burnt sections. A multimeter can be invaluable at this stage to check for electrical continuity.
If the heating element is damaged, replacement is often the best solution. Purchase a compatible replacement part by matching the model number of your dryer. Reversing the disassembly steps, install the new element securely.
After the installation, reattach the back panel and secure all screws and detached components. Plug in the dryer and run a test cycle to ensure the new element functions correctly.
By understanding these steps, you can efficiently resolve heating issues, improving the lifespan and performance of your dryer. Remember, consistent maintenance and timely repairs are key to keeping your appliances in top shape.
Explore our guides for more advice on maintaining your home appliances to ensure they function at their best.
Frequently Asked Questions: Dryer Not Heating
What are the signs my dryer’s thermal fuse is blown?
Common signs include the dryer not heating, longer drying times, and the dryer not starting.
How can I test if the thermal fuse is blown?
Use a multimeter to check for continuity. A lack of continuity indicates the fuse is blown.
Where is the thermal fuse located in a dryer?
The thermal fuse is usually located on the dryer’s blower housing or near the heating element.
What causes a dryer’s heating element to fail?
Overuse, overheating, and power surges are common causes of heating element failure.
Can I replace a dryer heating element myself?
Yes, with basic tools and safety precautions, most people can replace the heating element themselves.
How often should I check the heating element and thermal fuse?
It’s advisable to inspect them annually as part of regular appliance maintenance.
What safety precautions should I take when testing these components?
- Unplug the dryer before beginning.
- Wear protective gloves.
- Ensure all tools are rated for electrical work.